When it comes to achieving a low taper fade haircut, precision and technique are essential. Start by evaluating your hair type and determining the right length for your desired look. With the right tools and a clear plan in place, you’ll be able to navigate the cutting process effectively. Understanding how to blend the fade seamlessly will elevate your style. Let’s explore the steps needed to achieve that sharp, polished appearance.
Key Takeaways
- Begin by evaluating your hair type and washing it with a mild shampoo and conditioner before the haircut.
- Use clippers to create a seamless transition in hair length, starting longer on top and gradually tapering down the sides.
- Maintain symmetry throughout the cut by regularly checking both sides in the mirror.
- Schedule regular trims every 3-4 weeks to keep the fade looking fresh and clean.
- Consult with your barber to customize the fade according to your face shape and hair texture.
Understanding the Low Taper Fade
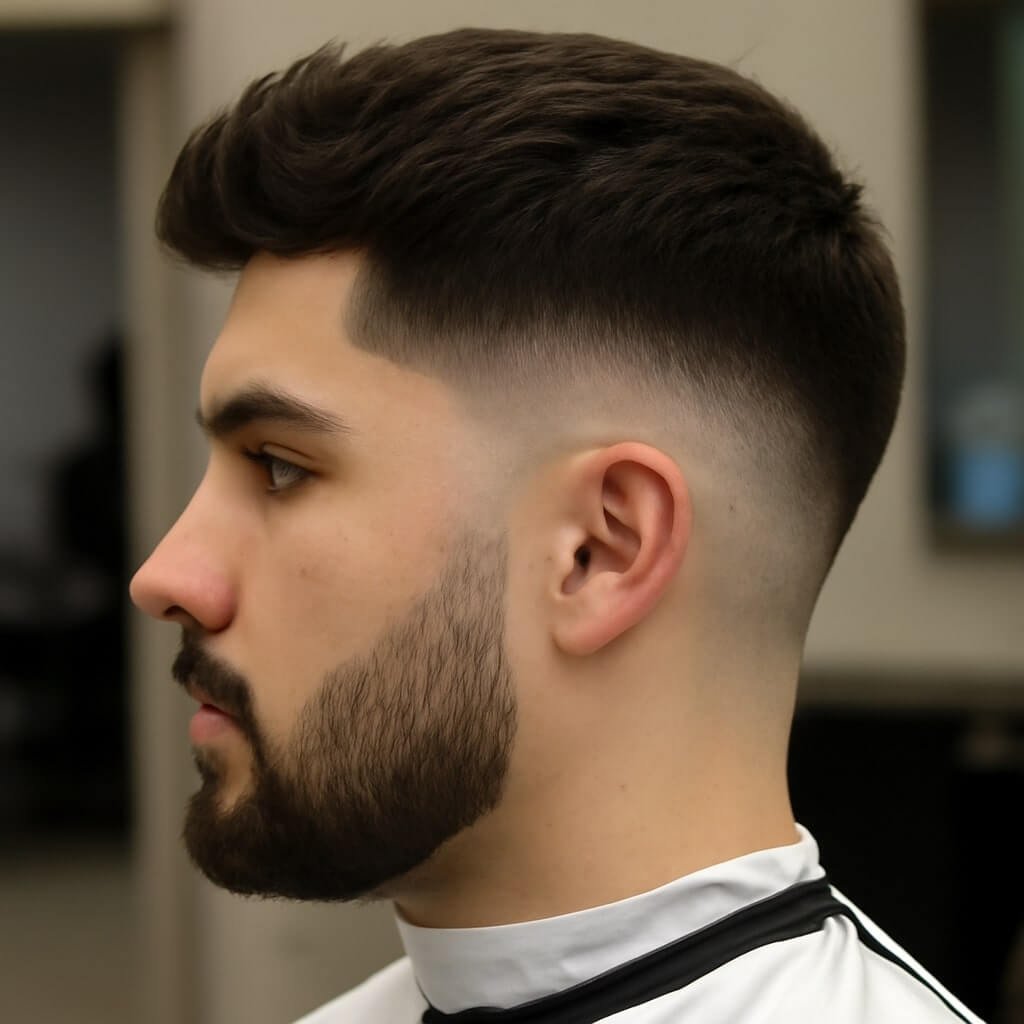
When you consider a fresh haircut, understanding the low taper fade can greatly enhance your grooming choices.
The low taper fade, a popular choice among taper styles, smoothly shifts hair length from the top down to the sides and back. Its roots trace back to the fade history, which emphasizes a gradual reduction in hair volume.
The low taper fade offers a seamless transition in hair length, enhancing your overall style with its subtle, gradual approach.
Unlike traditional fades that might start higher, the low taper begins just above the ears, offering a subtler look. This style not only adds dimension to your hairstyle but also enhances facial features.
It’s versatile, complementing various hair types and lengths. By grasping these elements, you’re better equipped to choose a low taper fade that fits your personal style and grooming routine.
Preparing Your Hair for the Cut
To guarantee you get the best results from your low taper fade haircut, it’s important to prepare your hair properly before the appointment.
Start by evaluating your hair type—whether it’s straight, wavy, or curly—as this will influence the cut and styling options.
Wash your hair using a mild shampoo and conditioner suitable for your hair type to make sure it’s clean and manageable.
Avoid heavy styling products that could weigh down your hair, as this might hinder the barber’s ability to achieve a precise fade.
Instead, opt for lightweight products that enhance your natural texture.
Also, consider discussing your usual product selection with your barber; they can recommend suitable products tailored to maintain your new look post-cut.
Essential Tools for a Low Taper Fade
Achieving a flawless low taper fade requires the right tools in your barber’s arsenal.
First, you’ll need a variety of hair clipper types, including adjustable clippers for precise length settings and trimmers for clean edges. Opt for clippers with a powerful motor to handle different hair textures.
A variety of clippers, including adjustable types and powerful trimmers, is essential for achieving clean, precise fades.
Next, fade combs are essential for blending the lengths seamlessly; they help create that smooth shift from short to long hair. A comb with varying widths allows for customization based on your desired fade intensity.
Additionally, quality scissors are important for detailing and texturizing the top.
Finally, don’t forget a good mirror, as it’s imperative for ensuring symmetry and precision throughout the cutting process.
Having these tools will set you up for success.
Step-by-Step Cutting Process
Before you begin the cutting process for a low taper fade, it’s essential to establish a solid foundation with a clear plan. Follow these steps to achieve the desired look:
| Step | Action | Result |
|---|---|---|
| 1 | Decide on the hair length | Sets the initial shape |
| 2 | Choose cutting techniques | Creates texture and fade |
| 3 | Use clippers for the fade | Guarantees uniformity |
Start with longer hair on top, gradually reducing the length as you move down the sides. Use your chosen cutting techniques to blend the hair smoothly. Remember, precision is key in achieving that sharp, low taper fade. Always check for symmetry as you progress.
Blending Techniques for a Smooth Transition
To achieve a seamless shift in your low taper fade, mastering fade graduation techniques is essential.
You’ll need to carefully select clip sizes that complement each stage of the fade, ensuring a gradual blend.
Additionally, understanding the various blending tools available can greatly enhance the precision of your cuts.
Fade Graduation Techniques
While mastering fade graduation techniques requires practice, the key lies in understanding how to blend different lengths seamlessly.
Start with a clear plan for your fade styles, identifying where you want the shift to begin and end. Use fade techniques like the clipper-over-comb method to refine the blend, ensuring you work gradually from longer to shorter lengths.
Maintain consistent pressure and angle as you move through the hair, preventing harsh lines. Additionally, employ a blending shear for softer shifts, especially around the crown.
Regularly assess your progress in the mirror, adjusting your technique as necessary. With time and attention to detail, you’ll achieve a smooth, professional-looking fade that enhances your overall haircut.
Clip Size Selection
Selecting the right clip size is essential for achieving a smooth blend in your fade haircut. Start by determining the desired clip length; this will guide your choice of clip guard.
For a low taper fade, typically, you’ll want to begin with a larger guard, like a #2 or #3, to create a solid foundation. As you work your way down, gradually switch to smaller guards, such as #1 or #0, for a seamless shift.
Make sure you overlap each section slightly to avoid harsh lines. Remember, the key is to blend effectively between the different lengths, so don’t hesitate to adjust the clip guard as needed until you achieve that polished look.
Blending Tools Overview
Understanding the right blending tools is essential for achieving a seamless shift in your low taper fade haircut. A quality pair of clippers with adjustable blades is fundamental for executing precise fade changes.
You’ll want to utilize guards of varying lengths to create a gradual blend, allowing you to navigate between different hair lengths smoothly. Furthermore, blending shears can refine the edges and eliminate harsh lines, enhancing the overall look.
For detailed work, a trimmer is invaluable for cleanly defining the nape and sideburns. Mastering these blending techniques will elevate your fade, ensuring it transitions effortlessly from short to long, while maintaining a polished appearance.
Invest in quality tools, as they greatly impact the final result.
Styling Your Low Taper Fade
To achieve a polished look with your low taper fade, you’ll want to focus on both the cut’s precision and the styling products you use.
Start by applying a lightweight styling cream or pomade to damp hair; this adds texture and helps define your style. Use a comb or your fingers to distribute the product evenly, guaranteeing that the fade shifts smoothly.
Apply a lightweight styling cream to damp hair for added texture and a smooth fade.
For finishing techniques, consider using a blow dryer with a diffuser to enhance volume, directing airflow away from the scalp.
Once styled, finish with a light-hold hairspray to maintain your look throughout the day.
Maintenance Tips for Longevity
Maintaining your low taper fade is key to keeping it looking fresh and sharp. Start with regular trims every 3-4 weeks to preserve the fade’s clean lines.
Utilize quality hair care products to guarantee your hair remains healthy; a sulfate-free shampoo and a lightweight conditioner are ideal for daily use. For styling, consider a pomade or styling cream that offers hold without weighing your hair down.
Apply these products sparingly to avoid buildup, and always wash your hair thoroughly to remove excess product. Additionally, protect your scalp from sun exposure with a lightweight SPF.
Incorporating these maintenance tips and product recommendations will help extend the life of your low taper fade, guaranteeing it stands out with precision and style.
Common Mistakes to Avoid
When getting a low taper fade, don’t skip the consultation step with your barber; it’s essential for achieving the desired look.
Ignoring your hair texture can lead to a mismatch in style and maintenance difficulty.
Skipping Consultation Step
While it might seem tempting to skip the consultation step before getting a low taper fade haircut, doing so can lead to unsatisfactory results. The consultation benefits are vital for achieving the look you desire and avoiding misunderstandings.
Here’s what you can gain from this essential step:
- Clarification: Discuss your specific preferences and expectations.
- Customization: Your stylist can tailor the haircut to suit your face shape and hair type.
- Visual References: Sharing pictures helps convey your desired style more effectively.
- Professional Insight: Stylists can offer advice on what styles work best for you.
Investing time in a consultation guarantees that you and your stylist are on the same page, leading to a haircut you’ll love.
Ignoring Hair Texture
Neglecting to take into account your hair texture can greatly impact the outcome of your low taper fade haircut. Different textures require specific styling techniques to achieve the desired look. For instance, coarse hair may need more blending, while fine hair might necessitate careful layering to avoid flatness. Understanding your hair’s natural characteristics guarantees your fade complements your overall style.
| Hair Texture | Recommended Styling Techniques | Common Mistakes |
|---|---|---|
| Straight | Light pomade for hold | Over-producting |
| Wavy | Texturizing spray | Ignoring volume |
| Curly | Curl cream for definition | Skipping moisture |
| Coarse | Thickening mousse | Not blending well |
Variations of the Low Taper Fade
The low taper fade haircut offers numerous variations that cater to different styles and preferences, ensuring you can find the perfect look for your personality.
Here are four popular options:
- Low Taper Fade with Buzz Cut: A clean, minimalist style that emphasizes sharp lines and a uniform length, perfect for a no-fuss look.
- Low Taper Fade with Crew Cut: This combines the classic crew cut’s short top with a tapered fade, delivering a neat, sophisticated appearance.
- Textured Low Taper Fade: Incorporates longer hair on top styled with texture, adding volume and dimension.
- Curly Low Taper Fade: Perfect for those with natural curls, blending a taper with defined curls on top for a stylish contrast.
Explore these variations to find your ideal low taper fade!
Conclusion
To summarize, achieving a low taper fade requires careful preparation, the right tools, and precise cutting techniques. By following this guide, you can create a stylish look that enhances your features. Remember to maintain your fade with regular trims and proper styling products to guarantee it stays sharp. Avoid common mistakes, and don’t hesitate to explore variations that suit your personal style. With practice and attention to detail, you’ll master the art of the low taper fade.