To achieve the perfect high and tight haircut, you need to understand the fundamentals of the style. This cut requires precision in choosing clipper guards and mastering the fade technique for a clean, professional look. Before you sit in the chair, it’s essential to prepare by discussing your desired outcome with your stylist. With regular maintenance and the right products, you can guarantee your haircut remains sharp and polished. Let’s explore each step in detail.
Key Takeaways
- Choose the right clipper guards, typically #1 or #2 for sides, to achieve the desired length and style for a high and tight haircut.
- Master the fade technique by starting with the longest guard and working down, ensuring smooth transitions without harsh lines.
- Prepare for the cut by consulting with a stylist, bringing reference images to clarify your desired look and expectations.
- Maintain the haircut with regular trims every 4-6 weeks to keep edges sharp and the overall shape defined.
- Use lightweight, non-greasy hair products for a subtle shine and polished finish, avoiding heavy products that can weigh down short hair.
Understanding the High and Tight Haircut
The high and tight haircut is a classic military style known for its clean, minimalist appearance. This haircut history traces back to the early 20th century, reflecting the military’s need for practicality and discipline.
It features short sides and a slightly longer top, allowing for easy maintenance in rigorous environments. The military influence on this style emphasizes uniformity and professionalism, making it a popular choice among service members.
Its simplicity not only symbolizes a no-nonsense approach but also promotes hygiene and comfort in various climates. As you consider adopting this haircut, remember its roots in military tradition and how it conveys an image of readiness and precision, all while being effortlessly stylish for everyday life.
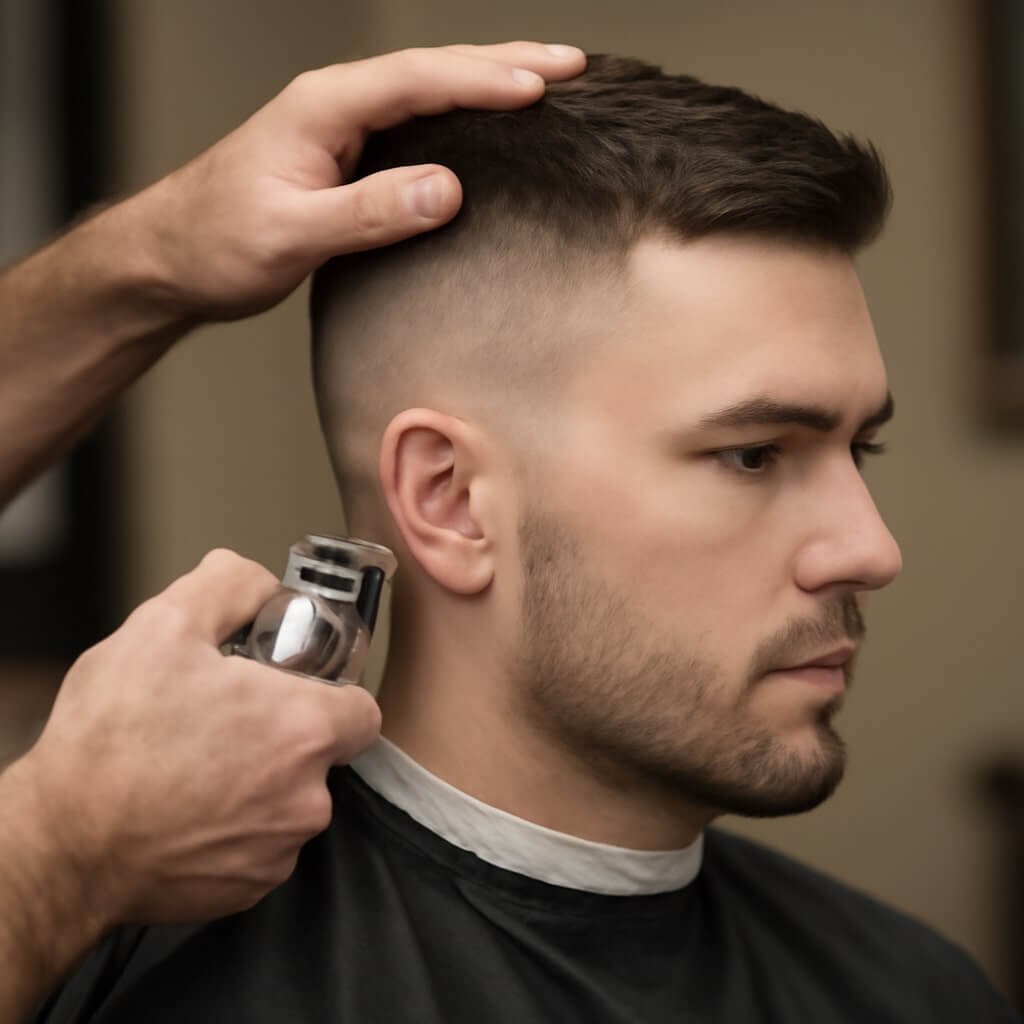
Choosing the Right Clipper Guards
Choosing the right clipper guards is essential for achieving the perfect high and tight haircut.
You need to understand the different guard sizes and how they affect hair length, especially when creating fades.
Additionally, adjusting the length based on your desired style will help guarantee a clean and polished look.
Understanding Clipper Guard Sizes
Understanding clipper guard sizes is vital for achieving a high and tight haircut that suits your style. Clipper guard types determine the length of hair left on your scalp, so selecting the right guard is essential.
Common clipper guard lengths range from #0 (1/16 inch) to #8 (1 inch), with various intermediate sizes available. For a high and tight look, you’ll typically use shorter guards, such as #1 or #2, to keep the sides neat while leaving a bit more length on top.
Familiarize yourself with each clipper guard type and its corresponding length to guarantee precision in your haircut. This knowledge allows for tailored adjustments to match your personal preferences and desired outcome.
Best Guards for Fades
When it comes to achieving a fade, selecting the right clipper guards is key to blending different lengths seamlessly.
Using the right guards guarantees precision while practicing fade techniques. Here are four essential guards to evaluate:
- #1 Guard (1/8 inch) – Great for starting the fade; it removes bulk without going too short.
- #2 Guard (1/4 inch) – Ideal for blending into longer hair; it smooths the shift.
- #3 Guard (3/8 inch) – Provides a seamless flow into the longer top; useful for defining the fade.
- #4 Guard (1/2 inch) – Perfect for the upper section of the fade; it helps maintain balance.
Adjusting Length for Style
To achieve the perfect high and tight haircut, selecting the right clipper guards is essential, as they directly influence the overall look and balance of the style.
Start by evaluating your style preferences; some may prefer a more dramatic contrast, while others lean towards a subtle fade. Choose clipper guards that provide appropriate length variations—typically, a #1 or #2 guard for the sides works well to create a clean shift.
For the top, consider a longer guard, like #3 or #4, to maintain some volume. Adjusting the length precisely guarantees you maintain the haircut’s structure while catering to your personal taste.
Experimenting with guard sizes will help you discover the perfect balance between length and style.
Mastering the Fade Technique
To master the fade technique, you’ll need the right tools and a clear step-by-step process.
Understanding how to blend different lengths while avoiding common mistakes is essential for achieving a seamless shift.
Let’s break down the necessary equipment, the fading process, and pitfalls to watch out for.
Tools Needed for Fading
Although mastering the fade technique requires practice and skill, having the right tools can greatly streamline the process.
To achieve a clean and polished fade, make sure you’re equipped with the following:
- Quality clippers – Invest in a durable clipper with adjustable settings for various fading techniques.
- Blending shears – These help to seamlessly blend different lengths, ensuring a smooth shift.
- Clipper guards – Use various guard sizes to create the desired fade effect and maintain control over the hair length.
- Cleaning brush & oil – Regular clipper maintenance is essential; keep your tools clean and well-oiled for peak performance.
With these essentials, you’ll be well on your way to perfecting your fading skills.
Step-by-Step Fading Process
Mastering the fade technique involves a series of precise steps that require attention to detail.
Begin by selecting your desired fade pattern, whether it’s a low, mid, or high fade. Start with the longest guard size and work your way down, using fading techniques to create a seamless progression. Cut the sides and back first, moving in a circular motion to blend the hair smoothly.
After establishing the foundation, switch to a shorter guard for the next section, ensuring you overlap slightly with the previous length to avoid harsh lines. Use clipper-over-comb methods to refine edges and achieve the perfect gradient.
Regularly step back to assess your work, ensuring each section flows naturally into the next for a polished finish.
Common Mistakes to Avoid
When you’re perfecting the fade technique, it’s crucial to recognize common mistakes that can compromise your results.
Avoid these haircut pitfalls to guarantee a clean and professional look:
- Neglecting the Blend: Failing to properly blend between lengths can create harsh lines that ruin the fade.
- Using Dull Blades: Dull clippers can tug at hair, leading to uneven cuts and frustration.
- Rushing the Process: Hurrying through the fading can result in an inconsistent appearance; take your time.
- Ignoring Hair Texture: Different hair types require different techniques; not adjusting can lead to a poor fade.
Preparing for the Cut
Before you step into the barber’s chair, it’s crucial to gather the necessary information and tools to guarantee a successful high and tight haircut. Start with a haircut consultation to discuss your desired look and how it aligns with your personal style. Bring reference images to illustrate your expectations clearly.
| Essential Items | Preparation Steps | Tips for Success |
|---|---|---|
| Reference Images | Schedule a Consultation | Communicate Openly |
| Hair Products | Discuss Hair Type | Ask for Recommendations |
| Haircut Tools (if needed) | Review Maintenance Tips | Be Open to Suggestions |
Maintaining Your High and Tight
Once you’ve achieved the perfect high and tight haircut, maintaining its sharp appearance requires regular upkeep. Follow these steps to guarantee your look stays fresh:
- Schedule Regular Trims: Aim for a trim every 4-6 weeks to maintain the defined edges and overall shape.
- Use Proper Trimming Techniques: Familiarize yourself with clippers and scissors to keep the sides tight and the top manageable.
- Prioritize Scalp Care: Keep your scalp clean and moisturized to promote healthy hair growth and prevent irritation.
- Choose the Right Products: Use lightweight styling products to avoid weighing down your hair while keeping it looking polished.
Styling Tips for a Polished Look
To achieve a polished look with your high and tight haircut, it’s essential to focus on both styling techniques and product selection.
Start by using a lightweight styling product, like a matte pomade or styling cream, to add texture without weighing your hair down. Apply a small amount to damp hair for easy distribution. Use a comb to create a clean part and smooth down any flyaways.
For finishing techniques, consider using a finishing spray to lock in your style and provide a subtle shine. Avoid heavy products that can make your hair look greasy.
Finally, regularly adjust your style throughout the day to maintain that sharp, refined appearance. With these tips, you’ll guarantee your haircut looks its best.
Conclusion
Achieving the perfect high and tight haircut requires attention to detail and regular maintenance. By selecting the right clipper guards, mastering the fade technique, and preparing adequately for your cut, you can guarantee a clean and stylish look. Don’t forget to schedule trims every 4-6 weeks to keep your hair in shape. With the right styling products, you can easily maintain that polished appearance. Follow these steps, and you’ll consistently rock a sharp high and tight haircut.